
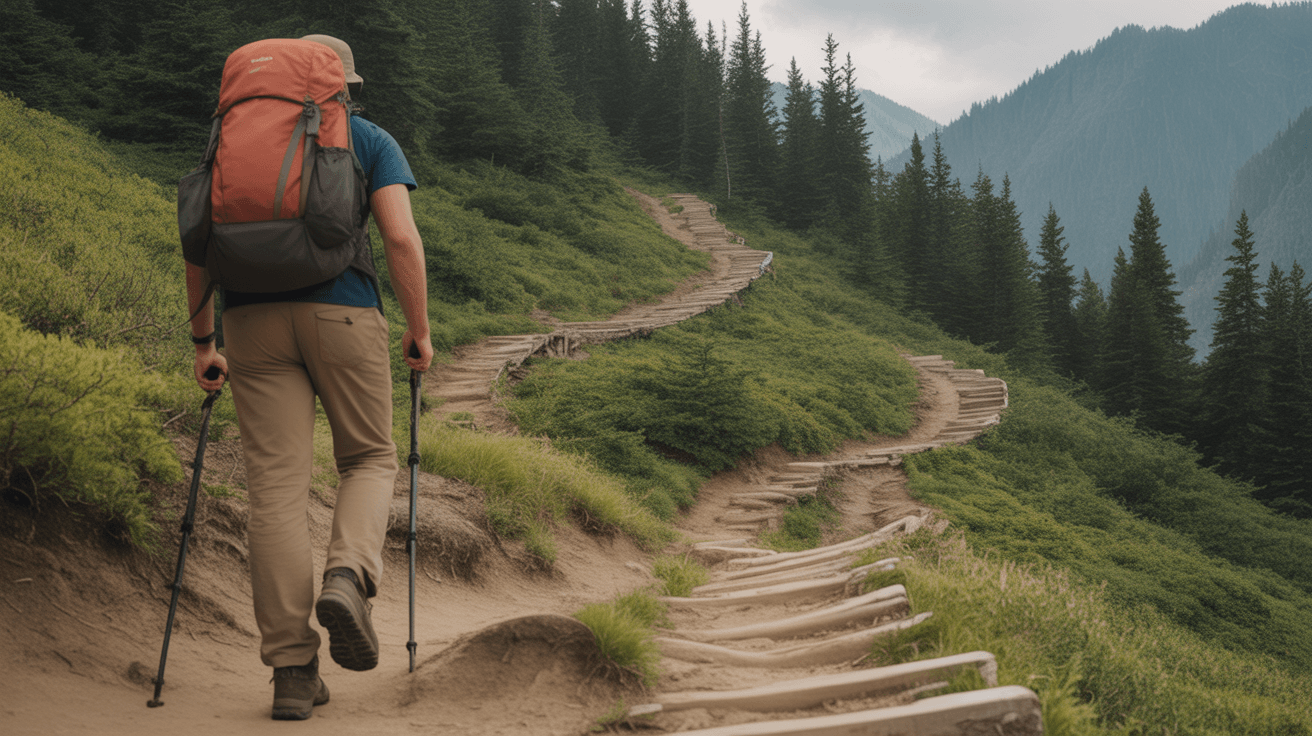
If you have been researching hikes or reading trail descriptions, you have probably come across the term “switchback” and wondered what it actually means. Maybe you saw a trail photo with a zigzagging path carved into a mountainside, or a trail report mentioned “endless switchbacks” and you were not sure if that was a good thing or a warning. You are not alone in your confusion, and the answer is simpler than you might think.
A switchback is a zigzagging section of trail that helps hikers climb steep terrain without walking straight uphill. Instead of creating a dangerously steep path, trail builders create a series of gentle, angled segments that switch back and forth across the slope. This guide will explain exactly what switchbacks are, why they exist, how to hike them efficiently, and what to expect when you encounter them on the trail.
What to Look For
What Exactly Is a Switchback Trail
A switchback is a trail segment that makes a sharp turn (usually 120 to 180 degrees) and heads back in the opposite direction at a slight upward angle. Rather than climbing straight up a steep slope, the trail zigzags back and forth, creating a series of gentler inclines. Think of it like the difference between climbing a ladder versus walking up a long ramp. Both get you to the same height, but the ramp requires less effort at any given moment because the grade is gentler.
You will recognize switchbacks when you see a trail that repeatedly turns back on itself, often visible from above or below as a series of parallel lines carved into a hillside. Each segment between turns is called a “leg,” and the sharp turn itself is the switchback. Well-designed switchbacks maintain a consistent, moderate grade (typically between 5 and 15 percent) across the entire climb, making steep elevation gain manageable even for hikers without mountaineering experience.
Switchbacks appear on all types of trails, from short nature walks with mild elevation gain to challenging mountain ascents that climb thousands of feet. The steeper the natural terrain, the more switchbacks you will encounter. A trail gaining 1,000 feet over two miles might have a dozen switchbacks, while a steep alpine route could have fifty or more.
Why Do Trail Builders Use Switchbacks Instead of Straight Paths
Trail designers do not create switchbacks to make your hike longer or more frustrating. They build them for three critical reasons: hiker safety, trail sustainability, and erosion prevention. A trail that climbs straight uphill creates serious problems that switchbacks solve.
First, straight-uphill trails are exhausting and dangerous. A slope steeper than 15 to 20 percent becomes difficult for most hikers to ascend safely, especially when carrying a backpack or descending on loose terrain. Your cardiovascular system can handle it for short distances, but sustained steep climbing leads to fatigue, which increases injury risk. Switchbacks keep the grade manageable so you can maintain a steady pace without overexerting yourself.
Second, steep trails erode rapidly. When water runs straight down a trail during rainstorms, it carves deep ruts, washes away soil, and creates hazardous conditions. Switchbacks angle across the slope, allowing water to drain off to the sides rather than channeling down the trail. This keeps the trail surface intact and reduces maintenance needs over time.
Third, steep trails encourage shortcuts. When hikers cut across switchback turns to save distance, they create social trails that destroy vegetation, compact soil, and accelerate erosion. Well-designed switchbacks with appropriate grades discourage cutting because the time saved is minimal and the effort is not worth it. You will often see signs asking hikers to stay on the trail at switchback corners for exactly this reason.
How to Hike Switchbacks Efficiently Without Wearing Yourself Out
Hiking switchbacks requires a different mindset than hiking flat or gently rolling terrain. The key is accepting that you will walk farther to gain elevation, and adjusting your pace and technique accordingly. Many hikers make the mistake of rushing switchbacks to get the climb over with, which leads to exhaustion halfway up.
Maintain a slow, steady pace that you can sustain for the entire climb. Your breathing should be heavy but controlled. If you cannot speak in short sentences, you are moving too fast. Experienced hikers call this the “rest step” technique: take a step, lock your downhill knee briefly to let your skeleton support your weight rather than your muscles, then take the next step. This micro-rest with each step prevents muscle fatigue on long climbs.
Use the full width of the trail. Switchbacks are typically wider at the turns to accommodate foot traffic in both directions. If you are ascending and another hiker is descending, the ascending hiker typically has the right of way (because it is harder to regain momentum going uphill), though courtesy and common sense should prevail based on group size and conditions.
Trekking poles make a significant difference on switchback climbs, especially for hikers with knee concerns or anyone carrying a heavy pack. Poles distribute effort across your upper body, improve balance on turns, and are designed to transfer load away from your lower body during descent. If you plan to hike trails with substantial elevation gain, trekking poles for beginners are worth considering even before you invest in expensive boots.
Take breaks at the switchback turns rather than in the middle of a leg. This keeps the trail clear for other hikers and gives you a natural stopping point to catch your breath, drink water, and look back at the view. Many hikers find that short, frequent breaks (30 seconds every few switchbacks) work better than infrequent long breaks, because your muscles do not cool down and stiffen.
What to Expect When Descending Switchbacks
Descending switchbacks is harder on your body than climbing them, even though it feels easier cardiovascularly. The repetitive impact of downhill hiking stresses your knees, ankles, and the muscles on the front of your thighs. Your hiking boots for beginners matter more on the descent than the climb. Boots with structured ankle coverage and midsole cushioning are designed to address the concerns hikers prioritize on downhill terrain, while aggressive tread patterns provide grip on loose dirt or gravel.
Descend slowly and deliberately. Many hiking injuries happen on the way down because hikers get tired, move carelessly, or try to make up time after a long climb. Plant each foot fully before transferring your weight. On steep switchback descents, consider a side-step technique at the turns rather than pivoting directly downhill, which puts less rotational stress on your knees.
Watch for loose rocks and erosion at switchback corners, where soil often gets disturbed by foot traffic. The inside corner (uphill side) of a switchback turn tends to be more stable than the outside edge. If the trail surface looks sketchy, step toward the inside.
Common Switchback Trail Etiquette and Leave No Trace Principles
The single most important rule of switchback etiquette is simple: do not cut switchbacks. Shortcutting might save you 30 seconds and 50 feet of walking, but it destroys vegetation, creates erosion channels, and eventually forces trail crews to rehabilitate damaged slopes. Social trails from switchback cutting can cause more environmental damage than the official trail itself.
Stay on the designated trail even when the switchback seems unnecessarily long or when you can see hikers above you on the next leg. Trail builders designed that route for specific reasons related to soil stability, water drainage, and vegetation protection. What looks like a pointless detour to you is actually an engineered solution to a problem you cannot see.
If you are hiking with a dog, keep them on the trail as well. Dogs naturally want to take the shortest route and will cut switchbacks if allowed to roam off-leash. Proper dog leashes for hiking keep your pet on the designated trail and prevent them from creating erosion or disturbing wildlife habitat.
Yield appropriately when meeting other hikers on narrow switchbacks. Generally, uphill hikers have the right of way because restarting an uphill climb requires more energy than continuing downhill. However, if you are climbing and see a large group descending, it may be more efficient for you to step aside. Use judgment and communicate with other hikers.
How Switchback Difficulty Varies and What Trail Descriptions Mean
When a trail description mentions switchbacks, pay attention to the context. “Gentle switchbacks through forest” suggests a well-graded climb with moderate effort. “Steep switchbacks” or “relentless switchbacks” indicates serious elevation gain that will challenge your fitness level. “Exposed switchbacks” means limited shade and potentially dramatic drop-offs, requiring sun protection and comfort with heights.
The number of switchbacks matters less than the total elevation gain and distance. A trail with five switchbacks gaining 800 feet is more strenuous than a trail with twenty switchbacks gaining the same elevation, because the first trail has a steeper average grade. Look at the elevation profile if available, not just the switchback count.
Some trails front-load elevation gain with switchbacks in the first mile or two, while others spread it throughout the hike. Front-loaded climbs mean you get the hard work done early and enjoy easier terrain later. Distributed climbs mean you will face switchback sections multiple times. Neither is inherently better, but knowing what to expect helps you pace yourself and prepare mentally.
Frequently Asked Questions
Are switchbacks harder than straight uphill trails?
Switchbacks are actually easier than straight uphill trails for sustained climbing, even though they require you to walk a longer distance. A switchback trail might be twice as long as a theoretical straight route up the same slope, but the grade is gentler, making it less exhausting and safer. The key is understanding that you trade distance for comfort. A straight uphill trail at a 30 percent grade will exhaust you quickly and increase injury risk, while switchbacks at an 8 to 12 percent grade allow you to maintain a steady pace without overexertion. Your cardiovascular system works consistently rather than spiking and crashing. Most hikers find switchbacks mentally challenging because you can see how far you still have to climb, but physically they are more manageable than steep direct routes.
Why do some trails have more switchbacks than others?
The number of switchbacks on a trail depends on the steepness of the terrain and the desired trail grade. Steeper mountainsides require more switchbacks to maintain a safe, sustainable angle. Trail designers aim for grades between 5 and 15 percent for most hiking trails, with occasional steeper sections up to 20 percent. A mountainside with a 40 percent natural slope will need many tightly-spaced switchbacks to reduce the hiking grade to 10 percent, while a hillside with a 20 percent natural slope needs fewer, longer switchbacks. Additionally, soil type, vegetation, and erosion potential influence switchback design. Rocky, stable terrain can sometimes support slightly steeper trails with fewer switchbacks, while loose or sandy soil requires more frequent turns to prevent erosion. Some older trails built before modern trail-building standards have fewer switchbacks and steeper grades than contemporary trails would.
How do you train for hiking trails with lots of switchbacks?
Training for switchback-heavy hikes focuses on building cardiovascular endurance and leg strength for sustained climbing. The most effective training is hiking hills or stairs with gradual grade increases over several weeks. Start with shorter climbs and gradually increase elevation gain and distance as your fitness improves. Stair climbing in stadiums, parking garages, or high-rise buildings mimics the repetitive stepping motion of switchbacks. Aim for sessions where you climb continuously for 30 to 60 minutes at a conversational pace, similar to how you will hike on the trail. Strength training for your quads, glutes, hamstrings, and calves helps, but trail-specific cardio is more important. If you live in flat terrain, treadmill incline walking works as a substitute, though it does not fully replicate the balance and stabilization requirements of outdoor switchbacks. Wearing a hiking daypack loaded with water bottles during training helps prepare you for the reality of hiking with weight on your back.
Can you skip switchbacks and go straight up if you are in good shape?
No, you should not cut switchbacks even if you are physically capable of climbing straight uphill. Cutting switchbacks is not about your fitness level. It is about preventing environmental damage and trail degradation. When hikers leave the designated trail to go straight uphill, they trample vegetation, compact soil, and create erosion channels that funnel water and wash away topsoil. These social trails become muddy scars on the landscape that require expensive rehabilitation work. Repeated cutting eventually forces trail crews to install barriers or reroute the trail entirely. Additionally, many land management agencies prohibit leaving designated trails, and rangers can issue citations for cutting switchbacks in some areas. The time you save is minimal compared to the damage caused. If you want a more direct workout, choose a trail that is naturally steeper rather than damaging a well-designed switchback trail.
What is the best way to pace yourself on long switchback climbs?
The best pacing strategy for long switchback climbs is finding a sustainable rhythm that you can maintain for the entire ascent without stopping frequently. Start slower than feels necessary and resist the urge to power up the first few switchbacks. Your pace should allow you to breathe heavily but still speak in short sentences. Many experienced hikers use the rest step technique: with each step, briefly lock your rear knee so your skeleton supports your weight while your muscles rest momentarily before the next step. This micro-rest prevents the muscle fatigue that comes from continuous contraction. Count your steps if it helps you maintain rhythm. Some hikers aim for 30 or 50 steps before a brief 10-second pause. Take breaks at switchback corners rather than mid-leg, which keeps the trail clear and gives you natural stopping points. Drink water and snack regularly during breaks to maintain energy. Your goal is arriving at the top tired but not destroyed, capable of enjoying the summit and hiking back down safely.

The Bottom Line
Now that you understand what switchbacks are and why they exist, you can approach switchback trails with confidence rather than confusion. These zigzagging paths are not obstacles put in your way to make hiking harder. They are carefully engineered solutions that make steep terrain accessible to hikers of all experience levels while protecting the landscape from erosion and damage.
If you are planning your first hike with significant switchbacks, start with a trail that has moderate elevation gain (500 to 1,000 feet) spread over a reasonable distance (2 to 4 miles) so you can experience switchback climbing without overwhelming yourself. Pay attention to how your body responds to sustained uphill hiking, adjust your pace as needed, and do not hesitate to take breaks. The hikers you see powering past you have done this many times before. You will build that endurance with practice.
For hikers concerned about knee stress on switchback descents, invest in trekking poles before attempting trails with more than 1,000 feet of elevation loss. The support makes a substantial difference in comfort and reduces injury risk. Stay on the designated trail, respect switchback corners, and never cut across to save time. The trail builders designed that route for good reasons, and your choices affect everyone who hikes there after you. With proper pacing, appropriate gear, and respect for trail etiquette, switchbacks become a manageable and even enjoyable part of hiking rather than something to dread.
Disclosure: As an Amazon Associate, we earn from qualifying purchases. This does not affect our editorial recommendations.